The Digital Bleek & Lloyd

Notebooks

Book: BC_151_A2_1_121

Collection: Lucy Lloyd !kun notebooks

Page Range: A2_1_121_10027.JPG - A2_1_121_10117.JPG

Image File: A2_1_121_FRTCV.JPG

Story: Covers and first pages of Lloyd's Book XI-1 or BC151_A2_1_121

Image File: A2_1_121_INFRT.JPG

Story: Covers and first pages of Lloyd's Book XI-1 or BC151_A2_1_121

Image File: A2_1_121_CON01.JPG

Story: Covers and first pages of Lloyd's Book XI-1 or BC151_A2_1_121

Image File: A2_1_121_10027.JPG

Story: End of Moon and Hare story

Image File: A2_1_121_10028.JPG

Story: End of Moon and Hare story

Image File: A2_1_121_10029.JPG

Story: End of Moon and Hare story

Image File: A2_1_121_10030.JPG

Story: End of Moon and Hare story

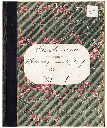
Image File: A2_1_121_10031.JPG

Image File: A2_1_121_10032.JPG

Image File: A2_1_121_10033.JPG

Image File: A2_1_121_10034.JPG

Image File: A2_1_121_10035.JPG

Image File: A2_1_121_10036.JPG

Image File: A2_1_121_10037.JPG

Image File: A2_1_121_10038.JPG

Image File: A2_1_121_10039.JPG

Image File: A2_1_121_10040.JPG

Image File: A2_1_121_10041.JPG

Image File: A2_1_121_10042.JPG

Image File: A2_1_121_10043.JPG

Image File: A2_1_121_10044.JPG

Image File: A2_1_121_10045.JPG

Image File: A2_1_121_10046.JPG

Image File: A2_1_121_10047.JPG

Image File: A2_1_121_10048.JPG

Image File: A2_1_121_10049.JPG

Image File: A2_1_121_10050.JPG

Image File: A2_1_121_10051.JPG

Image File: A2_1_121_10052.JPG

Image File: A2_1_121_10053.JPG

Image File: A2_1_121_10054.JPG

Image File: A2_1_121_10055.JPG

Image File: A2_1_121_10056.JPG

Image File: A2_1_121_10057.JPG

Image File: A2_1_121_10058.JPG

Image File: A2_1_121_10059.JPG

Image File: A2_1_121_10060.JPG

Image File: A2_1_121_10061.JPG

Image File: A2_1_121_10062.JPG

Image File: A2_1_121_10063.JPG

Image File: A2_1_121_10064.JPG

Image File: A2_1_121_10065.JPG

Image File: A2_1_121_10066.JPG

Image File: A2_1_121_10067.JPG

Image File: A2_1_121_10068.JPG

Image File: A2_1_121_10069.JPG

Image File: A2_1_121_10070.JPG

Image File: A2_1_121_10071.JPG

Image File: A2_1_121_10072.JPG

Story: Moon and Sun and Hares

Image File: A2_1_121_10073.JPG

Story: Moon and Sun and Hares

Image File: A2_1_121_10074.JPG

Story: Moon and Sun and Hares

Image File: A2_1_121_10075.JPG

Story: Moon and Sun and Hares

Image File: A2_1_121_10076.JPG

Story: Moon and Sun and Hares

Image File: A2_1_121_10077.JPG

Story: Moon and Sun and Hares

Image File: A2_1_121_10078.JPG

Story: Moon and Sun and Hares

Image File: A2_1_121_10079.JPG

Story: Moon and Sun and Hares

Image File: A2_1_121_10080.JPG

Story: Moon and Sun and Hares

Image File: A2_1_121_10081.JPG

Story: Moon and Sun and Hares

Image File: A2_1_121_10082.JPG

Story: Moon and Sun and Hares

Image File: A2_1_121_10083.JPG

Story: Moon and Sun and Hares

Image File: A2_1_121_10084.JPG

Story: Moon and Sun and Hares

Image File: A2_1_121_10085.JPG

Story: Moon and Sun and Hares

Image File: A2_1_121_10086.JPG

Story: Moon and Sun and Hares

Image File: A2_1_121_10087.JPG

Story: Moon and Sun and Hares

Image File: A2_1_121_10088.JPG

Story: Moon and Sun and Hares

Image File: A2_1_121_10089.JPG

Story: Moon and Sun and Hares

Image File: A2_1_121_10090.JPG

Story: Moon and Sun and Hares

Image File: A2_1_121_10091.JPG

Story: Moon and Sun and Hares

Image File: A2_1_121_10092.JPG

Story: Moon and Sun and Hares

Image File: A2_1_121_10093.JPG

Story: Moon and Sun and Hares

Image File: A2_1_121_10094.JPG

Story: Moon and Sun and Hares

Image File: A2_1_121_10095.JPG

Story: Moon and Sun and Hares

Image File: A2_1_121_10096.JPG

Story: Moon and Sun and Hares

Image File: A2_1_121_10097.JPG

Story: Moon and Sun and Hares

Image File: A2_1_121_10098.JPG

Story: Moon and Sun and Hares

Image File: A2_1_121_10099.JPG

Story: Moon and Sun and Hares

Image File: A2_1_121_10100.JPG

Story: Moon and Sun and Hares

Image File: A2_1_121_10101.JPG

Story: Moon and Sun and Hares

Image File: A2_1_121_10102.JPG

Story: Moon and Sun and Hares

Image File: A2_1_121_10103.JPG

Story: Moon and Sun and Hares

Image File: A2_1_121_10104.JPG

Story: Moon and Sun and Hares

Image File: A2_1_121_10105.JPG

Story: Moon and Sun and Hares

Image File: A2_1_121_10106.JPG

Story: Moon and Sun and Hares

Image File: A2_1_121_10107.JPG

Story: Moon and Sun and Hares

Image File: A2_1_121_10108.JPG

Story: Moon and Sun and Hares

Image File: A2_1_121_10109.JPG

Story: Moon and Sun and Hares

Image File: A2_1_121_10110.JPG

Story: Moon and Sun and Hares

Image File: A2_1_121_10111.JPG

Story: Moon and Sun and Hares

Image File: A2_1_121_10112.JPG

Story: Moon and Sun and Hares

Image File: A2_1_121_10113.JPG

Story: Moon and Sun and Hares

Image File: A2_1_121_10114.JPG

Story: Moon and Sun and Hares

Image File: A2_1_121_10115.JPG

Story: Moon and Sun and Hares

Image File: A2_1_121_10116.JPG

Story: Moon and Sun and Hares

Image File: A2_1_121_10117.JPG

Story: Moon and Sun and Hares

Image File: A2_1_121_BCKCV.JPG

Story: Covers and first pages of Lloyd's Book XI-1 or BC151_A2_1_121

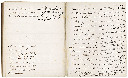
Image File: A2_1_121_SPINE.JPG